Showing posts with label diy. Show all posts

Friday, August 1, 2014

DIY Screen Printing on Tshirts

It's been done, probably 100 times over. But I think I may have found one of the most inexpensive and easiest ways to get er' done!
It all started when I jumped onto Instagram and notices all these adorable screen printed shirts. I fell in love! But at $20-35 each, x2 (remember, I have twins so its double everything!) It adds up FAST! We are always on a budget. And as much as I would love to just go buy every cute thing I lay my eyes upon and support some wonderful wham's, I cannot justify it!
SO, I decided to attempt this whole screen printing thing on my own.
Materials;

- 1 embroidery hoop (I found mine at a thrift store but Im sure you can find them at your local craft store!) Mine was $1
- Leotards/Nylons (Dollarama) $1.25
- Fabric Paint (I just purchased martha stewarts stuff but its leaves it stiff) $2,88 at Walmart
- T-shirt $1.25 - $2.00
- Printer + Design
- Something to cut design out (Those pen slicer things and rubber sheets are the BEST way to do this!)
- Thin plastic (I used paper, big NO NO! It bled through, so something very thing and plastic would work well!)
- Old card
TOTAL COST = UNDER $10 (I had some things on hand!)

I started by creating my design on my computer in photoshop. Then I printed it off. This is where you would need to lay it overtop of your plastic sheeting and use one of those slicing pens (make sure to have that rubber pad on the underside so you don't slice your table!) and slice out the pieces. I used paper, which didn't work so well.  I highly suggest using plastic!

I took my embroidery hoop, and stretched the leotards/nylons over it and held it into place. I stretched it a bit, but not too much and it didn't shift at all!

Then I laid the cut out on top of the shirt, and on top of that I laid the embroidery screen. This is the fun part...
I took out my paint and laid a generous amount of paint at the top of the design, NOT on the design! Then I took my old card and slide it across from top to bottom. Surprisingly, this worked amazing! minus the bleeding...


Next time I will use some plastic sheets to do my cut outs, that way you can re-use the design again. The other way I found online to create a screen print was to use mod lodge. I didn't like this idea because it would cause me to have to purchase multiple hoops or have to re-do the design again. (I imagine pulling off the nylon would make it impossible to put it back onto the hoop!)

I also would suggest purchasing some REAL fabric paint. The stuff I bought said it would be used for fabric, but it is quite stiff. It was only $2.88 though and I am sure I will get 5 + shirts out of the bottle...

I am going to attempt this again, REALY soon. I have a ton of shirts that I want done before the boys start kindergarten which is approaching way too fast!
Have you ever done any DIY screen printing? Would love to see how it turned out!

Saturday, May 10, 2014

Rainy diy, w/Free Printable

Yesterday was rainy. ALL day. But, I am not complaining! It is a welcomed change from the snow we got last weekend, yes in May! Sometimes I wonder why we live in such a cold climate where we really only get to enjoy summer weather for 3-4 months of the year.
Anyways, I decided to get my decorating and DIY'ing on since it's been awhile and came up with some cute chalkboard prints for my kitchen!
And since Im so awesome, I am going to link the download for them for FREE below. Your welcome. Feel free to share the love ;)


I created these using photoshop in an 8x10 size. (Standard US Paper size, aka, you can use regular printer paper OR photo paper from the dollar store!)
I just used some picture frames I had bought a long time ago and never used from the Dollarama store for $1.25 and painted them with black acrylic paint. I suggest using something a bit bigger than these though as I had to trim them up quite a bit, and even though I created a white matte border around them, after I cut them to fit inside the frames, the matte  border didn't show. So I ended up cutting a paper border with just regular printer paper. Nothing fancy over here peeps! And if you look closely at the top picture, the border I made cut off the text :(
Just use a bigger frame and save yourself the trouble!

Text was cut off in top picture!

The first one is because, well, it made me smile. The second one I created because I am forever trying to figure out conversions in the kitchen and I run around like a made women from the computer to the kitchen to figure them out!
So to grab these two printable's you can go HERE and HERE!
And if you used them, I would LOVE to see photos in your lovely homes! AND make sure to share them with your friends!
Sharing is caring! (At least thats how the saying goes ;)
HAPPY SATURDAY!

Saturday, May 3, 2014

I'm Still Alive!

Life has been busy. Scratch that. Life has been insanely ridiculous stupid busy! :/
I have been hard at work (outside of the home) and hard at work re-opening my ETSY shop and trying to keep up with my motherly/wifey duties!
So today's post is simple. All my favourite looks, locked into one post and the vision I have for the twins bedroom! A little boys room DIY have you. I have never had a chance to decorate, paint or even think about creating fun spaces, so I am super excited to start decorating!
Here are my favourites for a little inspiration;


Love these side shelfs for storage & the colours!

Planning on some digital art.

I have a similar children's chair in velvet red, upholstery job?

LOVE these! Maybe silver instead of yellow.


Does anyone else spend hours online looking for design ideas or am I the only one?! When I am done I plan to post a reveal. Hopefully soon! For now, I will stick with collecting ideas! :)


Friday, January 24, 2014

Wood Growth Chart DIY

Life has been crazy. Ok, understatement of the year. Incredibly insane busy! I never stop moving, someone always needs me to do something, and I'm exhausted pretty much all the time. Which, come to think of it, is probably why I've been sick for over a week...
Moving on! Thought I would share this quick DIY for those of you who are parents to some little ones and want to track their growth along with some memories!
We just purchased our new home, and with it came a wall full of the previous owners little markings of their children's growth. We're talking 12+ years of it! So when I seen one of these floating around the internet and places like ETSY for a pretty dime, I thought I would give a shot at it myself. I am in love. Seriously in love! I am upset that I didn't create it sooner but what can ya do.
Alright, so here is what I bought and a price break down; (Canadian prices of course!)

- Wood Fence Post. $2.97
Pretty sure it was cedar, also 7ft long and just under 5 1/2 inches in width. I went with something VERY light so if it did happen to come off the wall it wouldn't hurt anyone!
- Minwax Stain OR other. $0 OR about $8 if you have to purchase it. 
 I had some of this left over so I didn't need to purchase, but I got mine at walmart!
- Acylic Paint. $0 OR $1 if you have to purchase it.
I also have a ton of this in my stash!
- Sawtooth Hook  $0 also had OR $1 at dollar store.
- Very Fine paint brush $0 also had.
- Fine grit sandpaper $0. also had.
- Measuring Tape. $0 also had.
To make sure you get all the measurements right!
- Pencil $0 also had.
Not necessary, but came in super helpful when marking where the measurements needed to go!
- Scissors

The first thing I did was sand down any raw edges to make sure I wouldn't get any splinters! After I was done, I gave it a quick wipe and applied the stain. At this point, I think I spent all of 5 minutes. seriously. I thought to myself, how awesome is the project I'm almost already done! Not quite.... oh was I wrong.

I gave it about an hour to dry. It was still a little wet but I was impatient. I made my first mark on the bottom for 1ft. Keep in mind that you will be hanging this on the wall, so I accounted for that by adding 6 inches to the bottom of the board. I then marked out every foot with my pencil!

I took out my smallest art brush, were talking super small! It will get frustrating with something bigger, just trust me, you can't go to small! ;) Then I painted a longer, thicker line on all the markings I made for the feet!

Then I measured and used my pencil again, this time for the inches. Then I took my paint brush again, and painted all those lines once again, this time making them less thick, and less in width. Basically you want to mimic the lines on the measuring tape as far as lengths go.

Then I decided on the font I would like to use for the numbers, and printed them out on some cardboard using my printer. A cereal box would work nice for this. I then just cut out the shapes and used it as a template. First, I traced in pencil, then I went over it with the paint!

I then added the sawtooth hook onto the back. To hand it on the wall, I used toothpaste. Yes, you heard me right toothpaste. I put some on the back of the hook so when I placed it on the wall, I knew exactly where to place the nails. Paint would serve this same purpose though!

Remember the 6 inches I accounted for when I painted my lines? I measured 6 inches up from the bottom of my floor and marked it on the wall. Then I just lined up the bottom of my growth chart, pushed it against the wall and then I knew where to place the nails! After the nails were in, I could hang it on my wall, stand back, and admire it!

And now I am in LOVE with it! It was very simple to make, took me one night to create it and I had most everything on hand so it cost me a total of $3! A pretty good deal if you ask me, considering some of the nicer ones go for as much as $65 on ETSY! What do you think?


And if you haven't had a chance to see it yet, we posted a new video how to make gluten free, 2 ingredient playdough! Check it out and make sure to subscribe so you can see all our new videos. Hope you have a rad weekend!


Friday, December 20, 2013

First Home Project!

Before we decided to purchase our home, I knew that if we did, that the front entrance would be the first thing that had to be changed! I don't mean "had to" as in, it was ugly and I couldn't stand it, or that I just wanted it changed so dang bad. The previous owners had changed out the carpet to laminate, but in the process, a chunk of the flooring where the carpeting had been, was missing. It was just plywood. It was driving me insane, AND I didn't like the idea of having the plywood bare right where all our wet winter boots were going to pile up. So my wonderful husband, let me pick out some flooring and I got my Christmas present a bit early! Yay!

See the bare subfloor? Yea, not my favourite thing!
Our local hardware store had some very nice slate on sale. ($1.99sf to be exact.) At first I hated the thought of the little textures and having to clean it all out. Then, I looked at the other options which were all much more expensive than this slate. They also looked fake. Like they were digitally printed onto the ceramic. BLEH! So slate it was! And I have to say, I am in love with it. The colours and texture are amazing and totally our style!
It cost a total of $200, and we were blessed with a family friend who knows how to install this stuff properly and helped us out. (Thank you, thank you, THANK YOU! ;)
Doing the reno's in our home properly and not looking like a DIY disaster is incredibly important to us. After living in rentals where the landlords could care less, and everything was falling apart, we are ready to do things right and take care of them. No matter the work!

So that is our first project. Not huge, but big enough. And definitely adds more beauty to our forever home! What do you think? What kind of flooring have you dreamt of adding to your home?


Tuesday, December 17, 2013

the BEST Salt Dough Recipe!

Ok, so maybe not the best, but it was the best for me! Whenever I try to create some salt dough ornaments, which is pretty much every Christmas, it breaks and crumbles.  I was on a mission to figure out how to make my ornaments as awesome as my aunts. So I asked her, what was her trick? She literally has been making these since before I was born. Point in case; amazing salt dough ornament created by my aunt.

My aunt is obviously rocks at creating salt dough ornaments!
She told me the trick is to get the right consistency.  There is no secret ingredient, just have to practice playing with the flour, water ratio until you get something soft and pliable enough to mould into shapes without melting apart but not be so crumbly, as that will just create big cracks. So today I attempted my second batch of salt dough this year, and I think I got it just right! This is what I used;

- 1 cup flour (Robin Hood Brand)
- 1/2 salt
- 1/2 cold water

Once you have finished creating your ornaments, place them on a baking sheet at the lowest temperature you can for 3-6 hours.

I must be crazy, because I choose to make a special ornament to go with each of my niece's and nephew's Christmas gifts as well as my boys. That is 6 is total. When you are out to make ornate decorations and not just flat easy ones, it takes some time, but it was totally worth it!

And last week, I attempted to create a nativity set with salt dough. It turned out much more crumbly, but I like it! :) I still have to do the painting of it, but for a $0 budget, I think I did pretty good.

Have you ever made salt dough ornaments? I love making them as personal little touches, and they make a Christmas tree look that much more beautiful with some real love on it!

Fresh out of the oven, no paint!

Saturday, November 16, 2013

Christmas Photo Card Overlay's

It happened. We got dumped with snow overnight and there is no hope for a warm day in sight! I am little nervous as we are moving in exactly 1 week from today. None the less, we are making the most of the cold weather and staying nice and warm cuddled up in our jammies! I also took the time to make some pretty awesome Christmas Card overlay's for those of you who use photoshop and to help myself get in the Christmas mood. If you don't use photoshop, I am sorry, but it's what I use so thats what I created it in!  :P
I was going to list these in my ETSY shop but then decided I would offer it to my fabulous readers instead, and if you feel the need to donate towards my time, (which is SUPER appretiated!) you can do so by using paypal and using the button below;


You can download the psd. files from here! Text is editable as well as text colour. Only requirement is that you use this for personal use only! DO NOT re-sell digital files, products made from files, or use for clients if you are photographer! All my work is copyrighted to me. If you are photographer and would like to use for your clients, PLEASE email me and we can work something out! Thank you for respecting me and I hope you enjoy creating some awesome Christmas photo cards for your friends and family!
OH, and stay warm peeps! ;)

Monday, November 11, 2013

Super simple "Sweet 16" diy

She is 16. The beautiful little young women who I held at birth, helped care for, feed, bathe and taught is turning 16! Now if that doesn't make a person feel old, I don't know what would. This year I promised I would do 1 thing for her for her birthday; Set up a photo booth for her and her girlfriends.
This doesn't seem like a lot to ask, but for me, 4 hours of my time is precious! We have less than 2 weeks till we move, I'm working two jobs, and I'm over committed everywhere else. (And don't even get me started on my motherly house duties!) But none the less, I did it because I love the poop out of her!


I wasn't entirely sure what else to get her for her birthday, but I remembered seeing these really cute centre pieces that were overloaded with things that were specific for that person. I then thought about putting together something similar, but use the "vase" as a make-up brush holder" for future use! No wasting over here, we multi-use. So I headed to my nearest Dollarama and stocked up. I knew the idea I was going for, but wasn't sure what to add so I just went up and down the isles and whatever I thought would look good, I grabbed. My budget was $10. I spent just over $14. Here's what I got;


- Decorative glass container $2
- Craft vase filler $2
- Strawberry mil straws $1
- Perfume/Lotion pack $1.25
- Cheetah and Leopard underwear $1.50 each
- Make-up brush's $1.50 each
- Gift Bag $1
- Tissue paper $1
- Chocolate (boys gift from their halloween stock!)


I simply put the vase filler in the glass container and started adding things by sticking them into the vase. I then took the underwear and wrapped into the shape of a rose, and used tape to hold it together. I used the strawberry milk straws as a "stem" and stuck them into the vase with all the other goodies!


For the tissue flowers, I used youtube to figure out how to cut them, SUPER easy! Took me 5 minutes, and I used this video. I just taped them onto the ends of some more milk straws like the underwear.
Then I googled "Birthday Printable's" and found the little banner I used for the "Happy Birthday Tatum" part. I found the ones I used here. I did use photoshop to make them bigger and edit them to have her name on them.
That was it. Took me very little time to whip together, very affordable, and she loved it!


Have you ever had success with a dollar store gift that wasn't cheesy or cheap looking?


Wednesday, October 30, 2013

Halloween Memory Game

My boys have recently discovered match up games, and although I still need to keep an eye on them to make sure they have an understanding of the game and stay on track, I thoroughly enjoy this game because its an opportunity for me to spend some time with them! The other day I went ahead and created this little Halloween memory game for us to play together. My boys are just a little over 4, so its suitable for 4 +, and I would imagine most 3 year olds would understand how to play with some direction!

- Simply print out 2 copies, cut out, laminate if available, if not I have glued mine to the back of a cereal box for durability, and play! Oh and have fun. ;)
If you are not sure how to play memory, click here.


(Please do not redistribute on your blog/website, kindly point them back to this post! Thank you :) 


Friday, October 25, 2013

Nursing Cover, DIY

When I gave birth to my twins, I was bound and bent that exclusively nursing them was the way to go! And although I did just that for most part of their first year, at first I was nervous about how I was going to cover up with twins! Truth be told, I nursed SO often (some would say like a cow,) in that first year that I stopped caring about covering up. I only ever nursed one at a time except for maybe a couple of times that we tried football style and it just did not work for me, or them. So I was nursing a baby every hour. Literally. I got so sick of that cover that I just didn't care at times, and to be honest, I never did have a single person come up to me and tell me to cover up. My hunch is that they took one look at me and knew if they said a single word, I would tear them a new one and just squirt some milk in their eye, just for an extra measure. ;) Common, 2 babies vs 1 mom? Yea, didn't think so! But before I became confident didn't care about showing off my hooters, I sewed up a really simple nursing cover to help ease my fear of showing em off.
WARNING; After 6-7 months, it was nearly impossible to keep the nursing cover covering myself as my boys hated it and just kicked it off. Many, MANY people may, or may not have seen my beautiful bussums! If you are a first time mom, you have been warned.

When my good friend Jess first told me she was pregnant, and that she wanted to nurse, I knew I was going to whip this up because;
1. It was practical.
2. It is super easy to make, and super inexpensive!

This is what I used;
- Old piece of fabric from remnant pile at fabric store (a little more than 1 meter)
- Half a meter of boning, also found at fabric store
- 2 metal hooks/rings (mine were rectangle for this project)
- Scissors
- Iron
-Thread
- Sewing machine


Fabric pieces cut up.
1.) I cut two strips of fabric, wide enough to fold in over each other when sewn. To make sure they were the right width, I folded the fabric cut side towards each other, and held the metal hooks up to it to make sure it was the right width and would slide easily through the fabric straps.

Measuring straps before sewing them up.

2.) I then took out the rest of my fabric and set up my iron, and ironed the bottom and side edges of the fabric. I folded them over twice. Fold it in once, then over again a second time so the end is not sticking out and no fraying will happen. I did this also to the 2 straps I cut. You could also sew the straps, fabric design sides together, then turn it inside out and you would have your two strips for your strap. Either way, ironing makes it a LOT easier when it comes time to sew! Not necessary but so worth it. Then I sewed the bottom and sides of the big fabric piece, twice, so it had nice clean edges and wouldn't fray.

I sewed twice around the edges to make sure they wouldn't fray.

3.)  Then I took the fabric, and folded it in half so I could figure out where the middle of the fabric was, and I marked it at the top, also the side that has not been sewn yet. I did the same thing with the boning. Then I laid out both the fabric, and the boning, and matched up the marks I had made in the middle. I did this so I would know where to sew the boning in, right in the middle! I also marked about an inch or more from the top because the fabric was going to be sewn down over the markings and you will need these marking to know exactly where to place your boing when you thread it in.

Folding fabric in half to mark the middle.

4.) After I marked the fabric, I folded the top down just a smidgen, this will avoid fraying, and then I folded it down about half an inch (you can use your boning to measure how large of a strip you will need to thread the boning in.) Then I sewed it in place, so that I had a long strip along the top, open on both ends to thread the boning into place.

Little hole to thread boning
The hole should be just big enough to slip the boning through!


5.) After threading the boing into the middle, I sewed over each end of the boning so it wouldn't move around and would stay in place. Almost done!

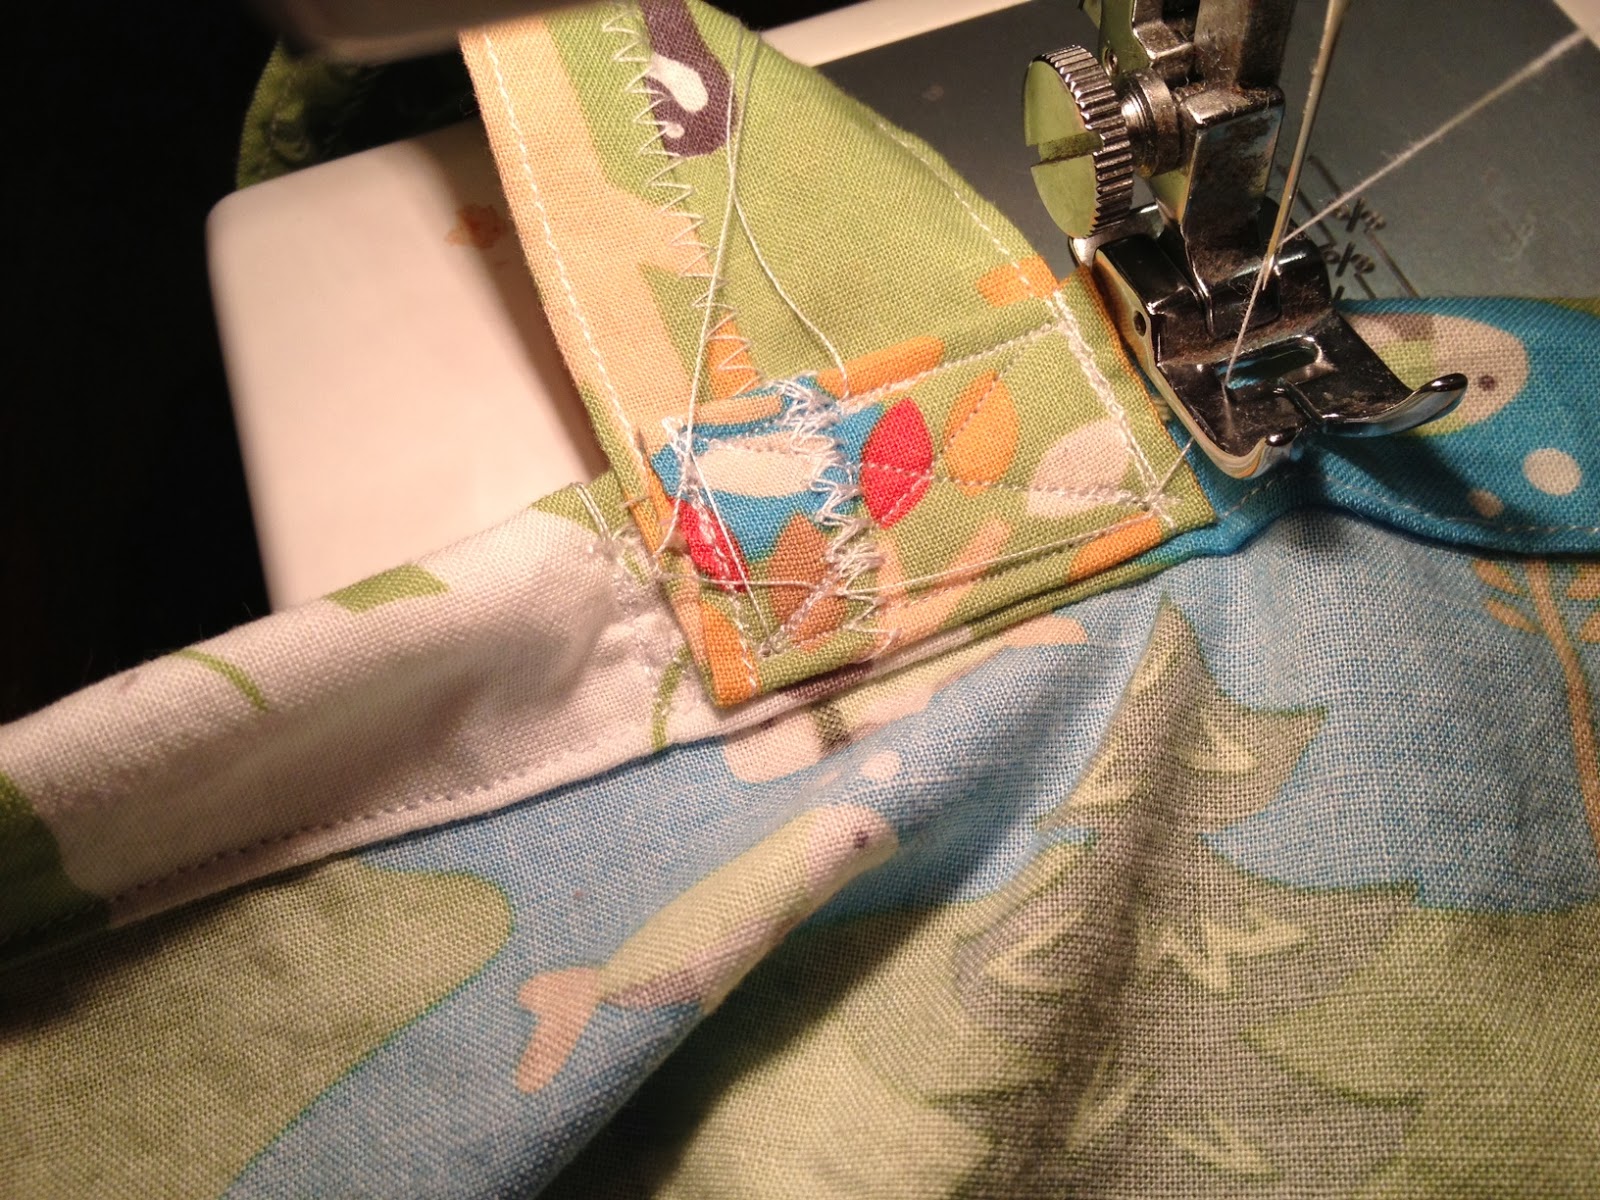
6.) The bottom of the nursing cover is done, now for the straps! Sew the straps up. Take one strap, fold it over twice so again you have no fraying edges, and place it directly next to the boning. I folded the bottom of my strap so that it was the same size as the tube I made to thread the boing through so it looked very clean. I then Sewed the strap into place creating a rectangle, and then again, creating a big "X" inside the rectangle to reenforce it. I then did the same thing to the other strap on the other side of the boning.

My straps sewn up. I cleaned them up with an extra set of stitches along the edges!

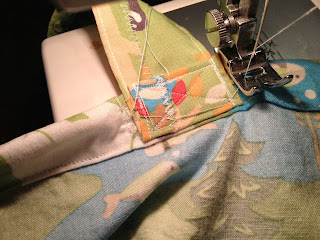
Side 1 with strap sewn in, directly next to boning and the big "X".

7.) Then, I took that same strap and put on the two metal hooks at the opposite end that I just sewed onto the nursing cover. I folded over the end, twice, and folded it back onto the strap on the other side of the hooks so the hooks would stay in place and not move up and down the strap.  (see image below)


8.) Than I just attached the other strap in the same way, making sure the ends won't fray and I was done! You should able to take the one strap and weave it through the two hooks so it is secure and adjust it as necessary.

The best part about this project is that it only took my a little over an hour, and I am no pro sewer so I would say this is probably the easiest sewing project I have ever taken on!
The price break down;
Boning = $3.50 per mitre. (half a mitre used)
Fabric = had in my stash, but anywhere between $3-$15 for 1 1/2 mitres
Thread = had in my stash
Metal hooks = $1.49
Everything else I had, sewing machine, iron, scissors.

So it cost me under $5 to make this nursing cover because I had a lot laying around, but is easily done for $10 if you have no extra fabric and need to hit up the fabric store!
And the best part? It is home made and appreciated a 1,000x more than a store bought gift. ;) At least, thats how I justify it!

Now I'm off to the pumpkin patch with my boys and to enjoy a much needed relaxing weekend! Which actually means more packing, 4 weeks until the big move day! Happy weekend everyone!


Wednesday, August 28, 2013

Printing on fabric, the easy way!

A few weeks ago, I stumbled upon a blog post that showed you how to sew up some pretty darn cute baby TOM look a-likes. Since I know a ton of people who are having babies, I thought I would give it a try and hope they turn out alright! Well, I finished my first pair, and they were hideous. Seriously people, I am not that bad on a sewing machine and I botched them pretty good! We will see if I ever find the confidence to try that again, lol. (You can find the tutorial and free pattern here!)

During the process, I had desperately wanted to add the cute little tags with their names on them just like the tutorial! One problem. All of the tutorials for DIY tags either called to send the fabric away, or buy transfer paper, two options which are way out of my price range for my little projects! Yes, I am more frugal than being frugal... Then I found a YouTube video that showed how to simply print directly onto some cotton fabric using your basic, at home printer. Perfect. Except, she called for some pretty hefty glue/spray which also defeated my frugal attempts. So I just played around till I got it right! This is the conclusion I came to.

First attempt;
I cut my piece of fabric, slightly smaller than a regular 8x10 piece of paper that I grabbed from my printer. Then I used a regular glue stick, and glued the fabric to the paper, so that the edge of the paper was larger than the fabric and the printer had something to grab onto. I then Ironed both sides of the fabric and paper, and was almost convinced that I was amazing and was going to succeed! This was an epic fail, because the glue was obviously not strong enough to hold the fabric in place as it slid through the printer! It just got caught and the fabric wouldn't run through.

SO, I gave up. Then I came back a few days later cause I really wanted to makes these baby TOMS look amazing!


Second attempt;
I cut another piece of fabric, same as before, slightly smaller than my piece of paper. This time, I used duct tape on the edges so that it laid flat and to make sure that the fabric didn't move around or come off of the paper. WIN!


It was super simple, I had everything I needed right at home, and I got great results. For some of you, this would be an awesome, affordable way to create custom garment tags for the products you sell on ETSY! The photos are pretty much self explanatory.


A few things to keep in mind;

1. Make sure to iron the fabric before printing so when it feeds through the printer, it doesn't come out all wonky.

2. When creating your images or text, make sure to place it near the middle of the document, not near the edges! If it's too close to the edges, it will miss the fabric. (I used photoshop to create my images, settings were "U.S. paper" at 8.5 x 11 inches.)

3. For the best results, use a light coloured fabric!


So in the end, I did figure out how to get some great looking tags printed onto fabric for next to nothing! But I still have yet to create cute baby slippers...

Saturday, May 11, 2013

Traveling with the littles (pt.2)

Eye Spy! with my little eye... We've all played it before. A classic game of eye spy in the backseat of our family vehicle, fighting with our big sister (or little brother) over who guessed it first! Well today, I bring a new type of eye spy to the table, and this one will bring those fights to an end! Unless of course you only make one, be prepared for war!

I first seen these floating around Pinterest about a year ago, I loved the idea, and I loved that we could use familiar objects that my kids loved to create it! The only downfall, is that I made only one. I figured two of the same book would be a big waste of money, and since I could only think of a few pages to add, I definitely didn't have enough Eye Spy pages for two separate books. This could be an awesome way to teach them to take turns and the importance of sharing, or it could go horribly wrong and cause said, war.

This book cost me just under $5 (Canadian), and these are supplies I needed;
- Camera
- Toys, grouped into 7-10 piles
- White piece of paper or blanket
- Little 4x6 photo album (found mine from dollar giant for $1.25)


First, I sorted their toys into groups. This was a little time consuming, but I had them help, which they really enjoyed! AND it gave me a chance to go through their toys and sort them! (Or dispose of them if they were broken/missing parts) So it was a win win :)

Then I got out my camera, arranged all the toys from one group onto the paper, and took a couple of shots. I then picked out 3-5 toys from that group, and took another picture of them, this time with a big blank spot to the left or right, to fill with words later in photoshop! pixlr.com/ works great too ;)
(NOTE: After I did this, I realized that wal-mart cropped some of the toys out of the image around the edges, so it is best to pick toys that are in the middle of the group so your child can actually find them!)
I did this with each group. Two photos.
Then I opened up the photos with the blank spots and filled it with text like, "Can you find these Thomas Characters?" I also created one for the front of their book that has their names on it.
Once I finished editing the photos, I sent them into Wal-mart online, and picked them up later! (ONLY reason I used Wal-Mart was because they had a sale on their 4x6 prints for 15¢, usually they are 25¢! I NEVER pay full price :)


This is the easiest part, once you grab your prints, you throw them into your little photo album and Ta-Da! You are done. Sit back and let your kids have fun! This was definitely a hit for the two of them, and hopefully something that will keep them busy in the backseat on our long journey this summer!
I would love to see your Eye Spy books, if you get a chance to make one, let me know so we can link up! Have a happy weekend :) OH, and I almost forgot, HAPPY MOTHERS DAY! To all your wonderful super moms out there ;)

If you are looking for a new blog design, check out my shop for $5 off this weekend ONLY, with special mothers days code; MOTHERSDAY2013


Sunday, May 5, 2013

Traveling with the littles ( pt.1! )

In just over a month, we will be taking a road trip. A very long road trip. It takes approximately 17+ hours from our house, to Salem Oregon where my husbands family all lives. But, and this is a really big but, that was before kids! Or, before wonderfully long hour sleeping babies who would let us drive mostly non stop, turned into toddlers. So in order to save my sanity, I have once again bit of plenty more than I can chew, and put together a list (no thanks to Pinterest) of car, bordem busters! This is the first of many...

Okay, so a few months back, or maybe many months back, I created a super easy, inexpensive dry erase book that can be used with play dough OR dry erase markers/crayons. This week, I created a few more pages to add to that book that are more car friendly! (and toddler friendly!) I found a few online that I liked, but all cost a bit to be able to print them or seemed too advanced for my almost 4 year olds, so I created my own. Cost me nothing but black ink from my printer, and I slipped them into the plastic pages I bought for my original dry erase book { here. }

I created 9 sheets, 1 - 9, that are simply numbers. For example, on number one they can trace the word one, and then find and circle of the 1's inside of the giant 1. Then I created a scavenger hunt page with images rather than words as my two are clearly not reading yet! When we pass by a cow, they cross it off. If they find someone talking on their phone, the cross it off. You get the idea :)


I showed them to the boys, and they were a hit! I told them what to do, and they caught on real quick. Now I just have to order some dry erase crayons from Amazon, and one of my many travelling pins are done! Hehe. Have you ever tried making a dry erase book for your little's while traveling, or have any advice for me?

You can find the original post and other free printables for your own DIY dry erase books over { here }. The books cost me $2 each from Dollarama, but I have also found plastic sleeves for $1 that can be snapped into a binder! I have linked to all of the pages below if you would like to print them off and use them in your own dry erase books. Happy traveling!

Numbers 1
Numbers 2
Numbers 3
Numbers 4
Numbers 5
Numbers 6
Numbers 7
Numbers 8
Numbers 9
AND
Pre-K Car Scavenger Hunt

I'm off on another project to beautify my backyard this weekend and hopefully get it summer ready!!! Hope everyone enjoys their weekend and you take a minute or two to stop and smell the roses! (or play with your kids; That'll work too!)


Super Sunday Sync


Monday, April 8, 2013

DIY fort kit!

Since the first time I seen a DIY fort kit floating around pinterest, I knew I wanted to make one. I didn't just pin it to my board along with the millions of other pins that I knew I probably would never get around to actually doing, this one stuck in my head! Thats why when my boys were invited to their friends 5th birthday, I knew I had to attempt my first one! I googled and looked at a ton of DIY fort kits on the internet to get an idea of what I was going to create, and this is what I came up with!


This is what you'll need;
(Prices & Place Purchased!)

- 2 sheets {one double sheet at mennonite thrift, $1.80. one single at Value Village, $4.99}
- 1 bag/case {found mine at Dollar Giant, $1.25}
- Rope {also from Dollar Giant, $1.25}
- Clamps {Dollar Giant, $1.25}
- Wooden clips {Dollarama, $1}
- Lantern {Dollarama, $2}
- Batteries for Lantern {Dollarama, $2}
- Lightning McQueen fabric {had in my stash}
- Felt {had in my stash}
- Glue gun and sticks {had on hand}
- Tags {construction paper and printer paper, all on hand}
I made sure that everything was colour coordinated, for mine that was red, browns and beiges!


Okay, so I started with the sheets. I took 7 thicker strips of my coordinating fabric, folded them in half right sides together, and sewed them together. Then I turned them inside right, and sewed each of the strips to a corner/side of my sheet, both ends together to create a loop, and one smack in the middle! Like this;


The second sheet, I decided to make ties instead of loops. Mostly because I was running out of fabric, but also because I didn't want to take as much time the second round! So I sewed up 7 thin strips of fabric and sewed them in the exact same spots as the loops. This time instead of sewing each end onto the sheet, I sewed them right in the middle so they could be tied onto something!

Then I created the tags in photoshop! I had seen other tutorials who had sent them into a photo lab and printed them that way. It is a great, cheaper alternative if you do not have a color printer or ink! I choose to just print them off on my printer, then glue them to a piece of construction paper to make them hold up better. Turned out better than I anticipated!
If you would like to use the same tags, you can download them here;


For the lightning bolt, I free handed it using some red felt I had sitting in my stash, and used a hot glue gun to attach it to the bag.

After I finished cutting and glueing the tags together, I attached them to everything! I used little metal rings for the lantern and rope only because I couldn't find anything else to attach them with! Twine or ribbon would have worked well.


Then I stuffed everything inside the bag and it was ready to go! Best part about this gift, it is unique and I am positive he will never receive another one ever again. That and the hours of fun, cause what little boy or girl doesn't love building forts?! :)
So I ended up spending more than I had wanted, just shy of $16. And if I did my research properly, most DIY fort tutorials come in around $10. BUT, taking into consideration I am in Canada and things typically cost more here, AND the fact that I know I would have spent at the very least, that much or more for some dumb toy he would play with once or twice and then throw to the curb or break. So was it worth it? YES! It was also very easy to complete and didn't take long!

Now go make one for every little boy and girl you know!!!